Saturday, February 26, 2011

dog booties - the pattern

Current Weather Updated: Fri, Feb. 25, 2011, 10:00 CST - Brandon Airport

Partly cloudy
-30
°C
Partly cloudy
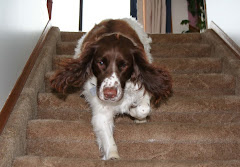
As I walk Lily every day, she has a genuine need for dog booties.  English Springer Spaniels are water dogs with webbed toes.  Lily gets ice balls in between her toes which makes it painful to walk when the weather is in the +5 to -10 range and frost bite when it is cold like this.  This is what her current set of booties look like.
 See how worn out the polar fleece is?  This is from her nails.
The materials required are :
  • polar fleece scraps
  • recycled leather from purses or old leather coats
  • elastic scraps 4 - 2" pieces
  • velcro (hook & loop tape) 4 - 1.5" pieces
Sometimes I take the leather off of existing worn out booties and reuse it for a new set.
The polar fleece for Lily's boots is 3.5" wide and 11.5" long.  The leather strips are about  6" long and 2.5" wide.
Centre the leather strips as shown above.  Cut four small rectangles of polar fleece to mount the elastic and loop tape end on.  These rectangles are bigger than then the elastic and velcro.  The excess is trimmed off after it is sewn.
I use upholstery thread, a leather needle and my  Pfaff 7510 to sew them.
Centre the leather on the polar fleece, then top stitch the leather in place.
 I use a 3-step zig zag stitch to do this rather than applique as it makes less holes in the leather.
Sew the scratchy side of the hook and loop tape one inch above the leather patch.  Sandwich half an inch of the elastic between the rectangle of the polar fleece and the soft side of the hook and loop tape.  Stitch the sandwich together.  Trim the excess polar fleece off the elastic tab.
Fold the leather and polar fleece bootie in half.  Then insert the elastic end of the tab in between the front and back of the bootie as shown in photo.  Stitch both sides of bootie shut and it is done.  Repeat process for all four.
 
Lily modeling her new booties!  Happy Saturday all!  Keep warm.

Thursday, February 24, 2011

Shannon's Quilt - the pattern

In the fall of 2009 I made this quilt for my daughter.
The pattern was published in Better Homes & Gardens Creative Collection 15th Anniversary Issue - American Patchwork & Quilting magazine April 2009 Issue 91.  It looks like card trick but uses rectangles and squares rather than triangle pieces to build the card trick effect.  I scanned the pattern from the magazine and added Shannon's diagram and email cutting instructions for free downloading at google docs.

More photos with building instructions for Shannon's quilt are available by googling my blog for Shannon's quilt.

Enjoy!

Monday, February 21, 2011

Créme de Menthe Cheesecake with Chocolate Glaze

Or Happy Birthday to me! The cheesecake recipe is from the Company's Coming cookbook series by Jean Paré.  This cookbook is called Tempting Treats & Cookies it was a Christmas gift to my daughter.  Shannon is storing her cookbook at my house while she is away at school.  A big thanks to her for that!  My mom sent me a cheque for $20 for my birthday which I promptly cashed then went out a bought an 8 inch spring form pan.
The chocolate glaze recipe was pulled off the net by googling "chocolate glaze recipe for cheesecake."
Chocolate Crumb Crust:
  • 1/2 cup butter or margarine
  • 2 1/2 cups chocolate wafer crumbs
  • 2 tbsp of granulated sugar (optional)
Place butter in microwave safe bowl heat on high about 35 seconds to melt the butter.  Add chocolate wafer crumbs and sugar.  Stir well.  Line the bottom of an 8 or 9 inch spring form pan with parchment paper.  I sprayed canola oil around the inside edge of the pan.  Press crumb mixture firmly and evenly in bottom of spring form pan.  Bake for ten minutes at 350 degrees F.  While crust is cooling make the filling.

Filling:
  • 3 - 8 oz or 250 gram blocks of cream cheese (softened or room temperature)
  • 1 cup granulated sugar
  • 4 large eggs
  • 2/3 cup créme de menthe liqueur
Beat cream cheese and sugar in large bowl until smooth.  Add eggs, 1 at a time, beating after each addition just until combined.  Add liqueur.  Beat well.  Spread evenly over crust.  Bake in 350 degrees F oven for 55 minutes.  Shut oven off and let sit in hot oven for 15 minutes.  Remove from oven and cool cheesecake.

Chocolate Glaze:
  • 1/2 cup heavy cream – (125ml)
  • 1/2 tablespoon unsalted butter – (7.5ml)
  • 2 1/2 ounces finely chopped semi-sweet chocolate – (75ml)
  • 2 1/2 ounces bitter-sweet chocolate – (75ml) 
For the glaze, combine cream and butter in microwave safe bowl. Bring to a boil and then mix in chopped chocolate.   Stir well, if the chocolate is not completely melted heat in microwave only long enough to melt chocolate.  Pour glaze over cheesecake while still in spring form pan.  Refrigerate at least 2-4 hours.  Remove spring form pan and your cake is ready to serve.
Special note: The recipe in the cookbook called for 3 - 4 oz packages of cream cheese, 2 eggs,  1/2 cup sugar and 1/3 cup liqueur.  I used 3 - 8 oz (250 gr) packages of cream cheese and doubled everything.  Before baking it my cheese batter was very runny, I poured it into the pan and a greasy clear fluid dripped onto the bottom of the stove while it was baking.  If I made this recipe again I would cut back to 3 eggs, 1/2 cup sugar  and 1/2  a cup of créme de menthe liqueur.

Approximate nutritional information:
  • 1 wedge
  • 486 calories
  • 31.6 gr total fat
  • 111 mg of cholesterol
  • 41 gr carbohydrate
  • 1 gr fiber
  • 7 gr protein
  • 340 mg sodium
Definitely not diet food!  I spent an extra one hour and 6 minutes on my treadmill to justify eating it.  My goodness it was delicious!  It freezes well, so the remainder of the cake is going into the deep freeze until my grown-up kids come home to help us eat it.

Enjoy!

Sunday, February 13, 2011

New Kitchen Floor

It is the colour of dirt! My favourite colour for flooring.
This is a laminate floor called Kenyon slate. It looks like ceramic tile and has a 32 year warranty.
 
On February 10 a crew of three guys started at 8:15 am, they were completely finished at 3:00 pm!
I know I should have put the empty water jugs in my truck before I took the photo.  Oh well.

 I love it! Happy Sunday all.

Sunday, February 6, 2011

Pfaff 7510 (Phyllis) Manufactured in Germany 1995

It has 99 stitches - 34 utility stitches (5 are buttonholes) and 65 embroidery stitches. Also, the alphabet and numbers in block and script.  It has the famous Pfaff IDT dual feed system, needle threader, needle up/down button, feed dogs can be dropped for free motion stitching, bobbin thread monitor, sewing help display based on the stitch chosen. I can change the stitch density and balance on embroidery stitches. Pattern mirror left to right and top to bottom. 
Phyllis sews lovely precise stitches.  She has a vertical loading bobbin.
 
 
I bought her used from the Brandon Sewing Centre in 2009.  She came complete with her original hard cover carrying case, accessories and operator's manual.
 
This is a sample of her stitches.  The spider web was free motion quilted.   I can alter the stitch width and length, as well as create pattern sequence of embroidery stitches and alphabet. Phyllis has nine memories to store pattern sequences.  This is the only sewing machine I own with instructions in the manual for embroidering a leather belt.
I use her to sew leather and polar fleece dog booties for Lily.  As well as free motion quilting, piecing, hemming denim jeans, putting in zippers and oven mitts.  Phyllis is a fantastic sewing machine she will sew threw anything I can fit under the presser foot without complaint.